
A dryer that tumbles but never gets hot turns laundry day into an all-day ordeal. Clothes come out damp after hours of running, energy bills climb, and frustration builds. If you are dealing with a dryer not heating in your USA home, the good news is that the causes are well understood — and most fixes are affordable. This guide covers every common reason a dryer stops heating, from free five-minute checks to repairs worth calling a pro for.
Dryers are relatively simple machines: a heating element (or gas burner), a thermostat system, airflow through the drum, and a vent to the outside. When heat disappears, one of these four systems has failed. Work through the checks below in order and you will find the culprit in most cases without spending a dime.
Quick Checks Before Anything Else
Start with the obvious. Make sure the dryer is set to a heated cycle — it sounds silly, but “air fluff” or “no heat” settings get bumped accidentally, especially on machines with dial controls. Check that the start button was pressed firmly and the door is fully latched; most dryers will tumble without heat if the door switch is marginal.
Verify the dryer is getting power. Electric dryers need 240 volts from a double-pole breaker — if one leg trips, the drum may still turn (on 120V) while the heating element gets nothing. Check your breaker panel for a tripped double breaker and reset it firmly. See how to troubleshoot a tripped breaker USA if it trips again. Gas dryers need the gas supply valve open — confirm the valve behind the dryer is parallel to the pipe (open), not perpendicular (closed).
Clogged Lint Filter and Vent: The #1 Cause
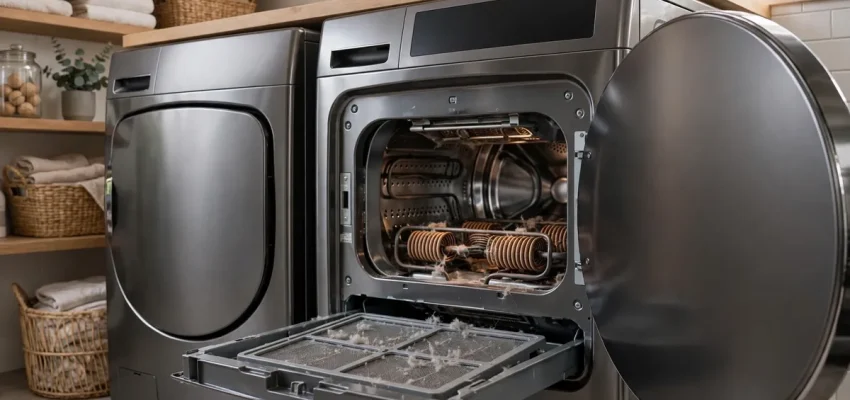
Restricted airflow is the single most common reason dryers stop heating properly. Modern dryers have thermal fuses and high-limit thermostats that cut heat when the machine overheats — and a clogged vent makes overheating inevitable. The dryer protects itself by killing the heat, leaving you with a tumbling-but-cold machine.
Clean the lint filter thoroughly — not just a quick swipe, but a real cleaning. Wash the filter with warm soapy water every few months; fabric softener sheets leave an invisible film that blocks airflow even when the filter looks clean. Test it by running water through: if water pools instead of flowing through, the filter needs washing.
Next, check the vent hose behind the dryer for kinks, crushing, or disconnection. Then inspect the exterior vent cap for lint buildup, bird nests, or a stuck damper. A vent run clogged with lint is also a serious fire hazard — the US Fire Administration attributes nearly 3,000 dryer fires per year to lint buildup. Professional dryer vent cleaning costs $100 to $170 and is recommended annually for heavy users. Clearing the vent often restores heat immediately and is the best first step in any extend appliance lifespan USA routine.
Thermal Fuse Failure
The thermal fuse is a one-time safety device that blows when the dryer overheats, permanently cutting power to the heating element. Once blown, it must be replaced — it cannot be reset. Replacement costs $100 to $200 professionally, with the fuse itself at $5 to $15.
Here is the critical part: a blown thermal fuse is a symptom, not the root cause. Something made the dryer overheat — almost always a clogged vent or failed cycling thermostat. Replace the fuse without fixing the underlying restriction and the new fuse will blow again within weeks. Always clean the entire vent path when replacing a thermal fuse. A technician should also test the thermostats to find why overheating occurred.
Heating Element (Electric Dryers)
The heating element is a coiled wire that glows red-hot to warm the air. Elements burn out after years of thermal cycling — a common failure on dryers 6 to 10 years old. Symptoms are simple: the dryer runs normally but produces zero heat.
Heating element replacement costs $150 to $300 including labor, with the element at $30 to $100 depending on brand. It is a moderate DIY job for handy homeowners: unplug the dryer (or kill the 240V breaker), remove the back panel, disconnect the old element, and swap in the new one. Always test the thermostats at the same time — a failed thermostat can kill a new element prematurely. If you are not comfortable working around 240-volt wiring, hire a pro; review DIY vs hiring an electrician USA: safety guide first.
Gas Dryer: Igniter, Flame Sensor, and Coils
Gas dryers heat with a burner instead of an element, and their no-heat failures follow a pattern. The igniter glows to light the gas — if it cracks or weakens, you get no flame. Igniter replacement costs $150 to $300. You can often diagnose it by watching through the peephole: a healthy igniter glows bright orange before the flame kicks in.
The flame sensor detects the burner flame and keeps the gas valve open. A faulty sensor shuts the gas off seconds after ignition, producing brief heat that quickly vanishes. Sensor replacement runs $100 to $200. Gas valve coils weaken with age and fail when hot — a dryer that heats for 10 minutes then goes cold is the classic symptom. Coil kits cost $20 to $40 and the repair totals $120 to $220 professionally.
Gas work demands respect. If you smell gas at any point, stop immediately, do not touch electrical switches, and call your gas utility’s emergency line. For non-emergency gas line questions, see gas line installation cost for home USA. Leave gas valve and burner repairs to qualified technicians unless you are experienced.
Thermostat Problems
Dryers use multiple thermostats: a cycling thermostat that maintains temperature, a high-limit thermostat as backup safety, and sometimes an outlet thermostat. When the cycling thermostat fails, the dryer may overheat (blowing the thermal fuse) or never reach temperature.
Thermostat replacement costs $100 to $220. Technicians test thermostats with a multimeter for continuity — a dead thermostat shows no continuity at room temperature. Because thermostats are inexpensive parts, pros usually replace the full set (cycling, high-limit, and thermal fuse) together during a no-heat service call, which prevents repeat visits. This “replace as a set” approach is standard practice across the appliance repair industry in the USA.
Timer and Control Board Issues
Less commonly, the timer or electronic control board fails to send power to the heating circuit. Symptoms include heat that works on some cycles but not others, or a dryer that stops advancing through the cycle. Control board replacement costs $200 to $400 — expensive enough that you should rule out every cheaper cause first.
Power surges damage control boards, so if your home has frequent electrical issues, a whole house surge protector is cheap insurance for the dryer and every other electronic appliance. Before condemning the board, a technician should verify voltage at the heating element terminals — no voltage with a good element means the problem is upstream in the controls or wiring.
When to Repair vs Replace
Dryers last 10 to 13 years on average. Apply the 50-percent rule: if the repair costs more than half the price of a comparable new dryer, replace it. A $150 thermal fuse or $200 heating element on a 6-year-old dryer is sensible; a $400 control board on a 12-year-old dryer is not.
Consider efficiency too. A new Energy Star dryer uses about 20 percent less energy than a decade-old model, and heat-pump dryers (growing in the US market) cut energy use dramatically — though they cost more upfront. If your dryer needs frequent repairs, replacement pays back through reliability alone. Our when to repair vs replace appliances USA guide walks through the full decision with worksheets.
Also weigh the vent situation: if your vent run is long, convoluted, or impossible to clean, a new dryer will suffer the same overheating fate. Fix the venting as part of any repair-or-replace decision. For laundry room renovations around a new machine, tile installation cost in USA covers durable flooring that handles the occasional leak.
Preventing No-Heat Problems
Clean the lint filter after every single load — no exceptions. Wash the filter with soap and water quarterly to remove softener film. Inspect and clean the vent run annually; hire a pro if the run is long or inaccessible. Do not overload the dryer — crammed clothes block airflow and strain the heating system.
Give the dryer room to breathe: at least a few inches of clearance behind the machine prevents kinked vents. Use the correct heat setting for the load — running everything on high heat wears components faster. These habits cost nothing and prevent the majority of no-heat failures. They are core to any how to extend appliance lifespan USA plan and take less time than one service call.
Frequently Asked Questions
Why is my dryer running but not heating?
The most common causes in order are: clogged lint filter or vent (causing thermal fuse to blow), failed thermal fuse, burned-out heating element (electric) or bad igniter/coils (gas), and faulty thermostats. Check airflow first — it is the cause more than half the time and the cheapest to fix.
How much does it cost to fix a dryer that is not heating?
DIY vent cleaning is free. Professional repairs run $100 to $200 for a thermal fuse, $150 to $300 for a heating element or igniter, $100 to $220 for thermostats, and $200 to $400 for a control board. Most no-heat repairs land between $150 and $300 total.
Can a clogged dryer vent cause no heat?
Absolutely — it is the number one cause. Restricted airflow overheats the dryer, which blows the thermal fuse or trips the high-limit thermostat, cutting heat as a safety response. Cleaning the vent often restores heat immediately. It also eliminates a major fire hazard.
How do I know if my dryer’s heating element is bad?
On electric dryers, a bad element means zero heat with normal tumbling. A technician tests the element with a multimeter — no continuity means it is broken. Visible breaks or blistering on the coil confirm failure. Elements typically last 6 to 10 years under normal use.
Is it worth repairing a 10-year-old dryer?
For repairs under $200, usually yes. For $300+ repairs like control boards, replacement is typically smarter — new dryers are more efficient and come with warranties. Factor in the vent condition too: a bad vent will damage a new dryer just as fast.
When your dryer stops heating, work the checklist in order: settings, power, lint filter, vent, then components. Most homeowners find the problem in the first three steps and fix it the same day. Keep the vent clear going forward and the heat will keep coming. For companion laundry guidance, see washing machine repair cost USA and our overview on how to extend appliance lifespan USA.